Happy Halloween

Halloween has always been a very special holiday for my daughter, Becky.  She’s decorated , thrown parties, dressed up, and made sure loved ones took care of important Halloween business.  She even dressed as a pumpkin and took her eldest son trick-or-treating two days before her youngest was born.

"Happy Halloween" message hand-lettered, with three cats among the letters.

Oh wait… she didn’t dress as a pumpkin that night; it was her pregnant stomach that made me  think pumpkin.  I digress.  Sadly Becky’s parents and older brother were less invested in Halloween.  We all just hid in our rooms while she threw elaborate parties during her teen years.  We’d sneak out occasionally to check on “things” that sometimes happen at teenage parties!

I believe I contributed to Becky’s interest in Halloween.  The following story will demonstrate my helping nature:Pencil drawing of 4 year old girl in a Halloween witch costume, holding a pumpkin.

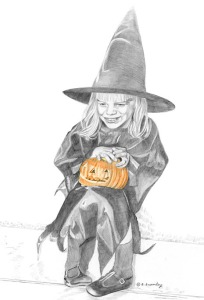
When Becky was 4, I had her pose in a witch costume, holding tightly to a pumpkin in her lap.  I was amazed at what a perfect, witchy expression she had on her frace.  Fine acting I thought!

As it turns out the pumpkin was moldy and stunk to high heaven.  Still,  Becky sat there for her mommy to get the perfect reference photos for a pencil drawing which became a Halloween card!

All I can say is “Becky you’re welcome!”

Thanks for listening.

Watercolor Hummingbird Signature

Mini Lesson – Watercolor Pansy

This “mini-lesson” shows step-by-step how I painted a pansy in watercolor.

  1. I begin by sketching the pansy with an HB pencil.  Make sure your drawing is accurate.  Lighten the pencil lines by dabbing at them with a kneaded eraser.  Contrary to what most books say, once wet these lines can’t be erased completely.

Watercolor Pansy Painting by Barbara Bromley a.k.a. artfulbarb on artfulpassages.com

  1. Using liquid frisket and a cheap brush coated with standard bar soap, mask out small detail areas which you wish to remain white. When the frisket is dry it will look and feel a bit like dried rubber cement.
  2. Mix the following puddles (a puddle is paint mixed with enough water to dilute it to the desired value):
  • Cobalt blue + alizarin crimson (warm & cool mixtures)
  • Aureolin yellow
  • New Gamboge
  • Alizarin crimson + new gamboge
  • Permanent rose
  • French ultramarine + alizarin crimson (warm and cool mixtures)
    Sap green
  • Winsor green + Hooker’s green + new gamboge
  • Hooker’s green + cobalt blue
  1. Next paint the base washes of the flower petals.

Watercolor Pansy Painting by Barbara Bromley a.k.a. artfulbarb on artfulpassages.com

  1. Glaze water over a petal until it glistens evenly; drop in the following colors and combinations based on where they can be seen in the petal): cobalt blue+alizarin; permanent rose, alizarin + new gamboge, and aurelion.
  2. While the first petal is drying, follow the same process on a petal which does not touch it (remember we don’t want wet paint to touch an area that is drying).
  1. After the base washes are completed on all 4 petals paint the dark purple sections following these steps:
  1. Using a fully loaded brush paint the dark area
  2. Then pull color out from the center of the dark area using a rigger brush to create the veins.
    * Use thicker puddles of both cool and warm mixes of French ultramarine + alizarin crimson for this area.

Watercolor Pansy Painting by Barbara Bromley a.k.a. artfulbarb on artfulpassages.com

  1. Add highlights to the edges of the petals by glazing over the base washes with the same mixtures.
  2. Rub off the frisket and add a light tint of yellow below the center part of the flowers. Leave the two white areas on the center of the right and left petals.
  3. Paint the base washes of the stem and leaves.
  1. Glaze water over the leaves and stem until they glisten evenly; drop in the following colors: Sap green, hookers green _ cobalt blue, and Winsor green + Hooker’s + new gamboge
  2. Add highlights by rewetting each darker area and painting a second glaze over it using the same mixes as were used in the base.

Watercolor Pansy Painting by Barbara Bromley a.k.a. artfulbarb on artfulpassages.com

If you have any questions, please add a comment below or grab me via the contact form.

Thanks,

Watercolor Hummingbird Signature

Grandma’s Kiss

When my son Nick was young we lived in Austin TX, often visiting family in Michigan for the summer.  Our first trip was a very long car ride, and Grandma Russell had been impatiently awaiting our arrival.   GrandmasKiss-For-Web-300x291She was so excited to see Nick that she planted a big, very visible lipstick kiss on his cheek!  It touched my heart so, I knew this was something I had to draw.  I wanted to make it special so I drew a heart of flowers around the portrait. Prior to that time I had not been an avid flower painter but this event got me started down a new path.  I hope you enjoy the drawing – to me it’s a golden oldy, loaded with sentiment!

Watercolor Hummingbird Signature

Mini Lesson – Watercolor Hummingbird

This “mini-lesson” shows step-by-step how I painted a hummingbird from one of my photos.

  1. I begin by sketching the hummingbird with an HB pencil.  Make sure your drawing is   accurate!  Lighten the pencil lines by dabbing at them with a kneaded eraser.  (Contrary to what most books say, once wet, these lines can’t be erased completely)

artfulpassages.com - Hummingbird Watercolor Lesson - Start w/Pencil Sketch

  1. I then mix the following puddles (a puddle is paint mixed with enough water to dilute it to the desired value):
  • Cobalt blue + Brown Madder (warm & cool mixtures)
  • Winsor Blue + Viridian Green
  • Sap Green
  • Alizarin Crimson  + New Gamboge
  • French Ultramarine + Payne’s Gray + a bit of Alizarin
  • Sepia + French Ultramarine
  1. Next I paint the base washes of the bird.

artfulpassages.com - Hummingbird Watercolor Lesson - Paint base colors

  1. For the eyes, feet, and beak use the Ultramarine/Payne’s Gray / Alizarin mixture.  Leave the white highlights untouched.
  2. For the back of the bird paint the Winsor Blue/Viridian mixture.  While it’s still wet add Sap Green next to it, letting the colors bump each other.
  3. For the belly, let Sap Green bump into the Cobalt Blue/Brown Madder (warm) puddles, letting the colors blend alongside each other.
  4. For the wing and head, use both the warm and cool Cobalt/Brown Madder mixtures;  then drop a little Sap Green into them while still wet.
  5. The rosy area under the belly is painted with Alizarin/New Gamboge.
  1. Allow all initial washes to dry!  Never paint into an area that has started to dry.
  1. Add the final details

artfulpassages.com - Hummingbird Watercolor Lesson - Add details

  1. Use the Sepia/Ultramarine mixture for dark highlights on the beak and feet as well as in the eye.
  2. For wing highlights use the cool Brown Madder/Cobalt mixture.

If you have any questions, please add a comment below!

Thanks,

Watercolor Hummingbird Signature