Mini Lesson – Painting a Bluebird

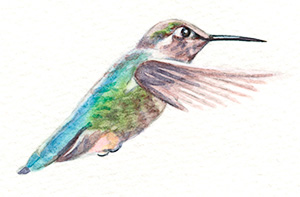
This “mini-lesson” shows step-by-step how I created a watercolor painting of a Bluebird.  For reference, here’s the finished painting:

Finished watercolor painting of a Bluebird, by artist Barbara Bromley

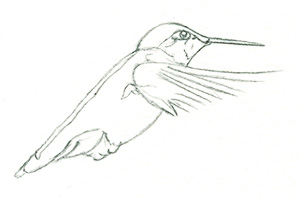
1. Begin by sketching the bluebird on your watercolor paper using an HB pencil. Make sure your drawing is accurate. Lighten the pencil lines by dabbing at them with a kneaded eraser. Contrary to what most books say, once wet, these lines can’t be erased completely.

Stage 1, pencil sketch, in preparation for watercolor painting of a Bluebird, by artist Barbara Bromley

2. Use liquid frisket to mask the outline of the bird. Use a cheap brush coated with standard bar soap to “paint” this outline, which will stay white. When the frisket is dry it will look and feel like dried rubber cement.

Stage 2. painting the edges around the bird, in preparation for watercolor painting of a Bluebird, by artist Barbara Bromley

3. Mix the following puddles (a puddle is paint mixed with enough water to dilute it to the desired value):

  • French Ultramarine + Hookers Green (make two puddles: one more bluish & one more greenish)
  • Cobalt Blue + Brown Madder (make three puddles: one dark purple; one reddish; one bluish)
  • Alizarin Crimson + Burnt Sienna
  • French Ultramarine + Paynes Gray + a bit of Alizarin
  • Burnt Sienna
  • Burnt Sienna + Raw Sienna
  • Cobalt Blue
  • Cobalt Blue + Winsor Blue
  • Cobalt Blue + Cerulean Blue
  • Cobalt Blue + French Ultramarine
  • Sepia + French Ultramarine (make two puddles: one very dilute light gray & one almost black)
  • New Gamboge

4. Paint the background

Background Painting

a. Glaze over the entire background until it glistens evenly; drop in the following colors and combinations based on where they can be seen in the photo:

To the left and lower right use French ultramarine/Hookers Green mixtures.

For the upper right (our light source) use more dilute greenish mixture of Ultramarine/Hookers Green; then drop in a bit of New Gamboge and a little Cobalt Blue/Brown Madder (reddish mixture) near the bird

Important – Make sure to paint quickly but stop if background begins to dry. The background can be re-wet after drying completely; Then stronger washes can be added.

b. Rub off the frisket to expose white outline.

5. Paint the base washes of the bluebird.

Stage 4. Paint background and bird further, in watercolor painting of a Bluebird, by artist Barbara Bromley

Applies to steps 5 and 6

Glaze water over the entire bluebird; drop in the following colors & combinations based on where they can be seen in the bluebird:

a) For the head use both the bluish & reddish Cobalt/Brown Madder mixtures
b) For the back of the bird paint Cobalt Blue/Ultramarine mixture. While it’s still wet, drop in a bit of the reddish cobalt blue/brown madder.
c) For the wings & tail use Cobalt Blue/Winsor Blue as well as Cobalt/Cerulean blue
d) For the belly, use very dilute mixtures of Burnt Sienna/Raw Sienna as well as the purple puddle of Cobalt/Brown Madder
e) For the eye, beak, and leg paint the French Ultramarine/Paynes Gray/a bit of Alizaring mixture; then while still damp add the darks with Sepia/French Ultramarine

6) Paint the log

a) Glaze water over the entire log until it glistens evenly. Paint a very dilute mixture of Sepia/French Ultramarine over the entire log.
b) While still wet drop in darker mixtures of Sepia/French Ultramarine on the left and lower middle.
c) Important – Allow washes to completely dry
d) For the final layer, use scumbling to create texture on the branch. Scumbling technique:

1. Squeeze most of the water from a round brush after dipping it in the Sepia/Ultramarine mixture.
2. Hold the belly of the brush (not the tip) flat to the paper and gently wipe it across the surface where it will hit the raised edges (grain) of the paper.

7. Allow all washes to dry! Never paint into an area that has started to dry.

8. Add the final details using wet-on-dry technique.

a) Use Cobalt/Brown Madder mixtures for head and wing details
b) Use French Ultramarine/Paynes Gray/Alizarin and Cobalt/French Ultramarine mixtures for tail details
c) Use purple mix of Cobalt/Brown Madder for detail below the wing
d) Use Burnt Sienna/Alizarin for chest detail

9. To create or regain white highlights, use the lifting technique:

a) Wet the previously dried area with clean water to reactivate the pigment.
b) Use a small bristle brush to scrub away the undesired areas of paint. ** Remember to dab the bristle brush on a paint rag between scrubbings to remove the paint you lifted rather than reapplying it elsewhere.
c) Dab the white areas with tissue.

10. Fini!

Finished watercolor painting of a Bluebird, by artist Barbara Bromley

Hope you enjoy!  If you have any questions at all, please use the comment form below.

Thanks, and happy painting!

Watercolor Hummingbird Signature

Save

Save

Save

Save

Save

Save

Save

Save

Save

Save

Save

Save

Save

Mini Lesson – Painting the Cat

I should clarify the title:  we’re not literally painting the cat 🙂 🙂 🙂   This “mini-lesson” shows step-by-step how I created a watercolor painting of my cat, Abby.

  1. Begin by sketching the cat with an HB pencil.  Make sure your drawing is accurate!  Lighten the pencil lines by dabbing at them with a kneaded eraser.  Contrary to what most books say, once wet, these lines can’t be erased completely.

    Pencil sketch of cat, in preparation for painting a watercolor

  2. Mix the following puddles (a puddle is paint mixed with enough water to dilute it to the desired value):
  • Cobalt blue + Brown Madder (warm purple mixture)
  • Burnt Sienna
  • Burnt Sienna + Raw Umber
  • Burnt Sienna + Raw Sienna
  • French Ultramarine + Payne’s Gray + a bit of Alizarin
  • Sepia + French Ultramarine
  • Alizarin Crimson + French Ultramarine (make two puddless:  One very dilute warm & one cool)
  • Alizarin Crimson + Burnt Sienna
  • Raw Sienna + Ultramarine (very dilute for the cat’s eyes)
  • Viridian Green
  • Winsor Green
  1. Mask out small detail areas which you wish to remain white.

Use liquid frisket and a cheap brush coated with standard bar soap to “paint” these white areas.  When the frisket is dry it will look and feel a bit like dried rubber cement.

  1. Next I paint the base washes of the cat.

Base watercolor wash of a cat, in preparation for painting a watercolor

Glaze water over the entire cat until it glistens evenly;  drop in the following colors and combinations based on where they can be seen in the cat’s face:

  1. For the eyes use the diluted raw umber/ultramarine mixture;  then drop in viridian green;  add the pupil using sepia/ultramarine.
  2. For the ears paint the raw umber/burnt sienna mixture;  then drop in the cobalt/brown madder mixture;  finish with the ultramarine/Payne’s Gray/Alizarin mixture before the ear dries.
  3. For the face and body let raw umber/burnt sienna bump into ultramarine/Payne’s gray/alizarin, allowing the colors to blend alongside each other.
  4. Add Winsor green and drop in viridian for the collar.

** If necessary wet a section at a time to keep the paper wet while painting the cat.  It’s important that you paint wet-in-wet not wet-in-dry!!

  1. Allow all initial washes to dry completely.  Never paint into an area that has started to dry.
  2. Rub off the frisket to expose white areas.
  3. Add the final details:
  1. Use sepia/ultramarine for dark black highlights.
  2. Use Alizarin/burnt sienna for reddish highlights in fur
  3. Use a second glaze of raw sienna/burnt sienna and raw umber/burnt sienna to form the area around the mouth and nose.
  4. Use a 2nd glaze of alizarin/burnt sienna, cobalt blue/brown madder, and raw umber/burnt sienna for hightlights in the cat’s ears.
  5. The collar tag is created using alizarin crimson.
  1. Finally if you have lost whites such as the whiskers use a rigger brush and a diluted mix of permanent white gouache to paint over the watercolor.

Final watercolor of a cat.  Part of a mini-lesson tutorial for this blog artfulpassages.com

Hope you enjoy!  If you have any questions at all, please use the comment form below.

Thanks, and happy painting!

Watercolor Hummingbird Signature

Tribute to Albert J. Russell

Maya Angelou wrote:

“I’ve learned that people will forget what you said, people will forget what you did, but people will never forget how you made them feel.”

Simply put, my dad made me feel cherished.  Four years after his death this feeling remains.Watercolor painting of the word Cherished, adorned with flowers and hummingbirds

He treasured his family.  I think he actually thought all five of his children were perfect, or maybe he just treated us that way.  He lost his mother at age seven and learned early the power of family.  Shortly before his death he told my husband that life had turned out so much better than he expected.

I believe when he met and married my mom, in Japan of all places, life began again for him.

Pencil skectch of father and daughter, Artist:  Barbara Bromley a.k.a. artfulbarb
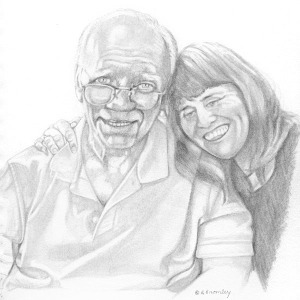
I’ve included the drawing I did after his death.  As usual art helped me to cope.  The drawing was done from a snapshot taken at his surprise 82nd birthday party.  Normally there would have been lots of photos from my own camera.  Unfortunately I landed in the hospital the night before.  When I finally arrived at the party unshowered, exhausted, and bedraggled, he looked up at me with pure joy.  As always, even at age 82 and wheelchair-bound, his strength of spirit lifted me up.

Pencil sketch of old man walking away, carrying a flowerI’m so glad that I agreed to the photo because it captured how I felt toward a dad who was/is my hero.

I read this quote recently in a greeting card:

“You honor him by the way you live your life”

Dad, I’m still trying!!

Watercolor Hummingbird Signature

Mini Lesson – Watercolor Pansy

This “mini-lesson” shows step-by-step how I painted a pansy in watercolor.

  1. I begin by sketching the pansy with an HB pencil.  Make sure your drawing is accurate.  Lighten the pencil lines by dabbing at them with a kneaded eraser.  Contrary to what most books say, once wet these lines can’t be erased completely.

Watercolor Pansy Painting by Barbara Bromley a.k.a. artfulbarb on artfulpassages.com

  1. Using liquid frisket and a cheap brush coated with standard bar soap, mask out small detail areas which you wish to remain white. When the frisket is dry it will look and feel a bit like dried rubber cement.
  2. Mix the following puddles (a puddle is paint mixed with enough water to dilute it to the desired value):
  • Cobalt blue + alizarin crimson (warm & cool mixtures)
  • Aureolin yellow
  • New Gamboge
  • Alizarin crimson + new gamboge
  • Permanent rose
  • French ultramarine + alizarin crimson (warm and cool mixtures)
    Sap green
  • Winsor green + Hooker’s green + new gamboge
  • Hooker’s green + cobalt blue
  1. Next paint the base washes of the flower petals.

Watercolor Pansy Painting by Barbara Bromley a.k.a. artfulbarb on artfulpassages.com

  1. Glaze water over a petal until it glistens evenly; drop in the following colors and combinations based on where they can be seen in the petal): cobalt blue+alizarin; permanent rose, alizarin + new gamboge, and aurelion.
  2. While the first petal is drying, follow the same process on a petal which does not touch it (remember we don’t want wet paint to touch an area that is drying).
  1. After the base washes are completed on all 4 petals paint the dark purple sections following these steps:
  1. Using a fully loaded brush paint the dark area
  2. Then pull color out from the center of the dark area using a rigger brush to create the veins.
    * Use thicker puddles of both cool and warm mixes of French ultramarine + alizarin crimson for this area.

Watercolor Pansy Painting by Barbara Bromley a.k.a. artfulbarb on artfulpassages.com

  1. Add highlights to the edges of the petals by glazing over the base washes with the same mixtures.
  2. Rub off the frisket and add a light tint of yellow below the center part of the flowers. Leave the two white areas on the center of the right and left petals.
  3. Paint the base washes of the stem and leaves.
  1. Glaze water over the leaves and stem until they glisten evenly; drop in the following colors: Sap green, hookers green _ cobalt blue, and Winsor green + Hooker’s + new gamboge
  2. Add highlights by rewetting each darker area and painting a second glaze over it using the same mixes as were used in the base.

Watercolor Pansy Painting by Barbara Bromley a.k.a. artfulbarb on artfulpassages.com

If you have any questions, please add a comment below or grab me via the contact form.

Thanks,

Watercolor Hummingbird Signature

A Grandma’s Legacy

Grandma grand daughter mothers dayIt’s been almost twenty years since my mother-in-law died and yet May, her month, still fills me with memories.  Her birthday was May 9 which seemed so appropriate with its proximity to Mother’s day.  She was the consummate mother.  She always remembered the little things that really are the big things.  Birthday cards were never late!!  Her journals were filled with positives;  not one critical word.  She saw only the best in people.

She and I shared a love of birds, flowers, family, and even the name Barbara Bromley.  She is missed by all who knew her, but the memories remain.

Happy Mother’s Day!

Watercolor Hummingbird Signature

Grandma’s Kiss

When my son Nick was young we lived in Austin TX, often visiting family in Michigan for the summer.  Our first trip was a very long car ride, and Grandma Russell had been impatiently awaiting our arrival.   GrandmasKiss-For-Web-300x291
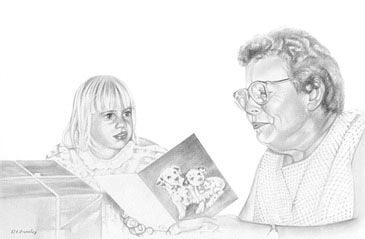
She was so excited to see Nick that she planted a big, very visible lipstick kiss on his cheek!  It touched my heart so, I knew this was something I had to draw.  I wanted to make it special so I drew a heart of flowers around the portrait. Prior to that time I had not been an avid flower painter but this event got me started down a new path.  I hope you enjoy the drawing – to me it’s a golden oldy, loaded with sentiment!

Watercolor Hummingbird Signature

Mini Lesson – Watercolor Hummingbird

This “mini-lesson” shows step-by-step how I painted a hummingbird from one of my photos.

  1. I begin by sketching the hummingbird with an HB pencil.  Make sure your drawing is   accurate!  Lighten the pencil lines by dabbing at them with a kneaded eraser.  (Contrary to what most books say, once wet, these lines can’t be erased completely)

artfulpassages.com - Hummingbird Watercolor Lesson - Start w/Pencil Sketch

  1. I then mix the following puddles (a puddle is paint mixed with enough water to dilute it to the desired value):
  • Cobalt blue + Brown Madder (warm & cool mixtures)
  • Winsor Blue + Viridian Green
  • Sap Green
  • Alizarin Crimson  + New Gamboge
  • French Ultramarine + Payne’s Gray + a bit of Alizarin
  • Sepia + French Ultramarine
  1. Next I paint the base washes of the bird.

artfulpassages.com - Hummingbird Watercolor Lesson - Paint base colors

  1. For the eyes, feet, and beak use the Ultramarine/Payne’s Gray / Alizarin mixture.  Leave the white highlights untouched.
  2. For the back of the bird paint the Winsor Blue/Viridian mixture.  While it’s still wet add Sap Green next to it, letting the colors bump each other.
  3. For the belly, let Sap Green bump into the Cobalt Blue/Brown Madder (warm) puddles, letting the colors blend alongside each other.
  4. For the wing and head, use both the warm and cool Cobalt/Brown Madder mixtures;  then drop a little Sap Green into them while still wet.
  5. The rosy area under the belly is painted with Alizarin/New Gamboge.
  1. Allow all initial washes to dry!  Never paint into an area that has started to dry.
  1. Add the final details

artfulpassages.com - Hummingbird Watercolor Lesson - Add details

  1. Use the Sepia/Ultramarine mixture for dark highlights on the beak and feet as well as in the eye.
  2. For wing highlights use the cool Brown Madder/Cobalt mixture.

If you have any questions, please add a comment below!

Thanks,

Watercolor Hummingbird Signature

Happy 59th birthday to me!

Welcome to my blog!

Come join me as I celebrate my last year in the “frantic fifties” and document my “Artful Passages” into my sixties and beyond.   In my artful blog/journal I’ll use writing, painting, drawing, and photographs to chart my blog-journey.

Since its my birthday and all, I deserve some cake don’t you think? In lieu of the real thing, let’s serve up a couple watercolors instead.  Lots less calories!

 artfulpassages.com - Watercolor Birthday Cakeartfulpassages.com - Watercolor Birthday Cake

Thanks for making this passage with me!

Barb

Watercolor Hummingbird Signature