Tutorial: Painting the Dog

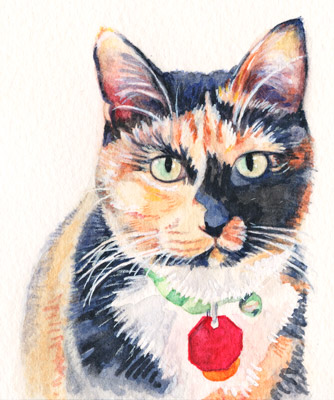
This “mini-lesson” shows step-by-step how I created a watercolor painting of a German Shepard named Lobo.

Barbara Bromley Watercolor painting lobo dog tutorial german shepard

  1. Begin by sketching the dog with an HB pencil.  Make sure your drawing is accurate!  Lighten the pencil lines by dabbing at them with a kneaded eraser.  Contrary to what most books say, once wet, these lines can’t be erased completely.Barbara Bromley Watercolor painting lobo dog tutorial german shepard pencil sketch
  2. Mix the following puddles (a puddle is paint mixed with enough water to dilute it to the desired value):
  • Cobalt blue + Brown Madder (3 puddles: warm purple mixture, red mixture, cool bluish mixture)
  • Burnt Sienna
  • Burnt Sienna + Raw Umber
  • Burnt Sienna + Raw Sienna
  • Sepia + Brown Madder
  • Sepia + French Ultramarine
  • Violet + Burnt Sienna (make two puddles: one more chocolate, and one more burnt sienna dominant)
  • Alizarin Crimson + Burnt Sienna
  1. Mask out small detail areas which you wish to remain white.
  2. Use liquid frisket and a cheap brush coated with standard bar soap to “paint” these white areas.  When the frisket is dry it will look and feel a bit like dried rubber cement.
  3. Next I paint the base washes of the dog.

Glaze water over the entire dog until it glistens evenly;  drop in the following colors and combinations based on where they can be seen in the dog’s face:

  • For the eyes use the raw sienna/burnt sienna & burnt sienna/Alizarin mixtures.  Outline with the cobalt/brown madder mixture, add the pupil using sepia/ultramarine.
  • For the ears paint the raw umber/burnt sienna mixture;  then drop in the cobalt/brown madder mixture;  finish with the ultramarine/sepia mixture before the ear dries.
  • For the face and body let raw umber/burnt sienna bump into ultramarine/sepia & violet/burnt sienna, allowing the colors to blend alongside each other.

** If necessary wet a section at a time to keep the paper wet while painting the base washes of the dog.  It’s important that you paint wet-in-wet not wet-in-dry!!Barbara Bromley Watercolor painting lobo dog tutorial german shepard

  1. Allow all initial washes to dry completely.  Never paint into an area that’s started to dry unless you’re using thick paint straight from the tube.
  2. Rub off the frisket to expose white areas.
  3. Add the final details:
  • Use sepia/ultramarine for dark black highlights.
  • Use Alizarin/burnt sienna for reddish highlights in fur
  • Use a second glaze of raw sienna/burnt sienna and raw umber/burnt sienna to form the area around the mouth and nose.
  • Use a 2nd glaze of alizarin/burnt sienna, cobalt blue/brown madder, and raw umber/burnt sienna for highlights in the dog’s ears.
  • The collar tag is created using alizarin crimson.
  • Use lifting to add lighter areas in the fur.
  1. Finally if you have lost whites such as the whiskers use a rigger brush and a diluted mix of permanent white gouache to paint over the watercolor.


Hope you enjoy!  If you have any questions at all, please use the comment form below.

Thanks, and happy painting!

Watercolor Hummingbird Signature


Mini Lesson – Painting a Bluebird

This “mini-lesson” shows step-by-step how I created a watercolor painting of a Bluebird.  For reference, here’s the finished painting:

Finished watercolor painting of a Bluebird, by artist Barbara Bromley

1. Begin by sketching the bluebird on your watercolor paper using an HB pencil. Make sure your drawing is accurate. Lighten the pencil lines by dabbing at them with a kneaded eraser. Contrary to what most books say, once wet, these lines can’t be erased completely.

Stage 1, pencil sketch, in preparation for watercolor painting of a Bluebird, by artist Barbara Bromley

2. Use liquid frisket to mask the outline of the bird. Use a cheap brush coated with standard bar soap to “paint” this outline, which will stay white. When the frisket is dry it will look and feel like dried rubber cement.

Stage 2. painting the edges around the bird, in preparation for watercolor painting of a Bluebird, by artist Barbara Bromley

3. Mix the following puddles (a puddle is paint mixed with enough water to dilute it to the desired value):

  • French Ultramarine + Hookers Green (make two puddles: one more bluish & one more greenish)
  • Cobalt Blue + Brown Madder (make three puddles: one dark purple; one reddish; one bluish)
  • Alizarin Crimson + Burnt Sienna
  • French Ultramarine + Paynes Gray + a bit of Alizarin
  • Burnt Sienna
  • Burnt Sienna + Raw Sienna
  • Cobalt Blue
  • Cobalt Blue + Winsor Blue
  • Cobalt Blue + Cerulean Blue
  • Cobalt Blue + French Ultramarine
  • Sepia + French Ultramarine (make two puddles: one very dilute light gray & one almost black)
  • New Gamboge

4. Paint the background

Background Painting

a. Glaze over the entire background until it glistens evenly; drop in the following colors and combinations based on where they can be seen in the photo:

To the left and lower right use French ultramarine/Hookers Green mixtures.

For the upper right (our light source) use more dilute greenish mixture of Ultramarine/Hookers Green; then drop in a bit of New Gamboge and a little Cobalt Blue/Brown Madder (reddish mixture) near the bird

Important – Make sure to paint quickly but stop if background begins to dry. The background can be re-wet after drying completely; Then stronger washes can be added.

b. Rub off the frisket to expose white outline.

5. Paint the base washes of the bluebird.

Stage 4. Paint background and bird further, in watercolor painting of a Bluebird, by artist Barbara Bromley

Applies to steps 5 and 6

Glaze water over the entire bluebird; drop in the following colors & combinations based on where they can be seen in the bluebird:

a) For the head use both the bluish & reddish Cobalt/Brown Madder mixtures
b) For the back of the bird paint Cobalt Blue/Ultramarine mixture. While it’s still wet, drop in a bit of the reddish cobalt blue/brown madder.
c) For the wings & tail use Cobalt Blue/Winsor Blue as well as Cobalt/Cerulean blue
d) For the belly, use very dilute mixtures of Burnt Sienna/Raw Sienna as well as the purple puddle of Cobalt/Brown Madder
e) For the eye, beak, and leg paint the French Ultramarine/Paynes Gray/a bit of Alizaring mixture; then while still damp add the darks with Sepia/French Ultramarine

6) Paint the log

a) Glaze water over the entire log until it glistens evenly. Paint a very dilute mixture of Sepia/French Ultramarine over the entire log.
b) While still wet drop in darker mixtures of Sepia/French Ultramarine on the left and lower middle.
c) Important – Allow washes to completely dry
d) For the final layer, use scumbling to create texture on the branch. Scumbling technique:

1. Squeeze most of the water from a round brush after dipping it in the Sepia/Ultramarine mixture.
2. Hold the belly of the brush (not the tip) flat to the paper and gently wipe it across the surface where it will hit the raised edges (grain) of the paper.

7. Allow all washes to dry! Never paint into an area that has started to dry.

8. Add the final details using wet-on-dry technique.

a) Use Cobalt/Brown Madder mixtures for head and wing details
b) Use French Ultramarine/Paynes Gray/Alizarin and Cobalt/French Ultramarine mixtures for tail details
c) Use purple mix of Cobalt/Brown Madder for detail below the wing
d) Use Burnt Sienna/Alizarin for chest detail

9. To create or regain white highlights, use the lifting technique:

a) Wet the previously dried area with clean water to reactivate the pigment.
b) Use a small bristle brush to scrub away the undesired areas of paint. ** Remember to dab the bristle brush on a paint rag between scrubbings to remove the paint you lifted rather than reapplying it elsewhere.
c) Dab the white areas with tissue.

10. Fini!

Finished watercolor painting of a Bluebird, by artist Barbara Bromley

Hope you enjoy!  If you have any questions at all, please use the comment form below.

Thanks, and happy painting!

Watercolor Hummingbird Signature

Save

Save

Save

Save

Save

Save

Save

Save

Save

Save

Save

Save

Save

Mini Lesson – Painting the Cat

I should clarify the title:  we’re not literally painting the cat 🙂 🙂 🙂   This “mini-lesson” shows step-by-step how I created a watercolor painting of my cat, Abby.

  1. Begin by sketching the cat with an HB pencil.  Make sure your drawing is accurate!  Lighten the pencil lines by dabbing at them with a kneaded eraser.  Contrary to what most books say, once wet, these lines can’t be erased completely.

    Pencil sketch of cat, in preparation for painting a watercolor

  2. Mix the following puddles (a puddle is paint mixed with enough water to dilute it to the desired value):
  • Cobalt blue + Brown Madder (warm purple mixture)
  • Burnt Sienna
  • Burnt Sienna + Raw Umber
  • Burnt Sienna + Raw Sienna
  • French Ultramarine + Payne’s Gray + a bit of Alizarin
  • Sepia + French Ultramarine
  • Alizarin Crimson + French Ultramarine (make two puddless:  One very dilute warm & one cool)
  • Alizarin Crimson + Burnt Sienna
  • Raw Sienna + Ultramarine (very dilute for the cat’s eyes)
  • Viridian Green
  • Winsor Green
  1. Mask out small detail areas which you wish to remain white.

Use liquid frisket and a cheap brush coated with standard bar soap to “paint” these white areas.  When the frisket is dry it will look and feel a bit like dried rubber cement.

  1. Next I paint the base washes of the cat.

Base watercolor wash of a cat, in preparation for painting a watercolor

Glaze water over the entire cat until it glistens evenly;  drop in the following colors and combinations based on where they can be seen in the cat’s face:

  1. For the eyes use the diluted raw umber/ultramarine mixture;  then drop in viridian green;  add the pupil using sepia/ultramarine.
  2. For the ears paint the raw umber/burnt sienna mixture;  then drop in the cobalt/brown madder mixture;  finish with the ultramarine/Payne’s Gray/Alizarin mixture before the ear dries.
  3. For the face and body let raw umber/burnt sienna bump into ultramarine/Payne’s gray/alizarin, allowing the colors to blend alongside each other.
  4. Add Winsor green and drop in viridian for the collar.

** If necessary wet a section at a time to keep the paper wet while painting the cat.  It’s important that you paint wet-in-wet not wet-in-dry!!

  1. Allow all initial washes to dry completely.  Never paint into an area that has started to dry.
  2. Rub off the frisket to expose white areas.
  3. Add the final details:
  1. Use sepia/ultramarine for dark black highlights.
  2. Use Alizarin/burnt sienna for reddish highlights in fur
  3. Use a second glaze of raw sienna/burnt sienna and raw umber/burnt sienna to form the area around the mouth and nose.
  4. Use a 2nd glaze of alizarin/burnt sienna, cobalt blue/brown madder, and raw umber/burnt sienna for hightlights in the cat’s ears.
  5. The collar tag is created using alizarin crimson.
  1. Finally if you have lost whites such as the whiskers use a rigger brush and a diluted mix of permanent white gouache to paint over the watercolor.

Final watercolor of a cat.  Part of a mini-lesson tutorial for this blog artfulpassages.com

Hope you enjoy!  If you have any questions at all, please use the comment form below.

Thanks, and happy painting!

Watercolor Hummingbird Signature